
Intermediate-level tips
Contents
Intermediate-level tips
So you've gotten to GCL3+ and you are wondering how to best prepare for the challenges that come with the next stage of the game. Look no further.
Minerals, and why you'll never have enough
Up until now, your rate of progress has been mostly influenced by how quickly you can bring in energy. That will remain important, but once you have a complete assortment of minerals you'll have a new opportunity to speed up your progress: boosting your upgraders with XGH2O. This compound gives you a +100% boost to upgrading points, thereby doubling your rate of gaining RCLs and GCLs. If you've been putting off your mineral-mining and compound-production code, you'll end up at a disadvantage compared to your neighbors who started earlier.
Of course, XGH2O isn't the only useful compound, you'll be making a wide assortment for combat purposes and other optimizations. But in peace time, XGH2O will probably end up being your most used compound.
Getting enough of each mineral type and producing enough for each of your rooms will be a challenge, but one that you can meet with a few prerequisites. The most critical piece to think about early-on is how you choose your rooms.
Choose your rooms wisely
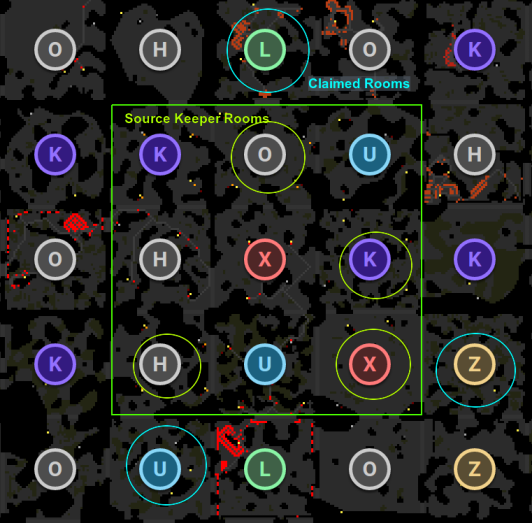
Creating a compound of XGH2O requires one of each mineral and 2 H. By the time you have 7 rooms (one for each mineral type) it should be possible to make it if you chose your rooms wisely. You may be able to do this sooner by harvesting the minerals from SK (Source Keeper) rooms, and SK rooms will be an important part of being able to produce enough for every room. As you gain new rooms, try to keep an even amount of each type. Although you'll be using twice as much H, those sources yield twice the amount.
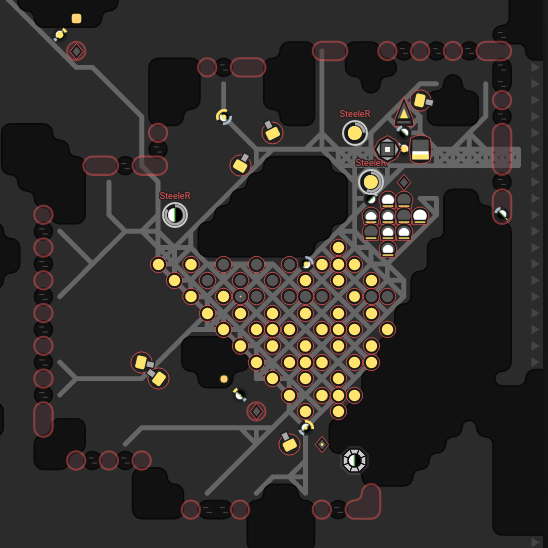
The above image shows an example of how you might settle around a group of SK rooms to get all the minerals needed with just 3 rooms (click to enlarge). It is a bit rare to have this kind of diversity of minerals in one area, so you'll need to work with what you have available.
Due to changes in mineral requirements, certain minerals will be more valuable than others. For example, H and O used to yield twice they amount that they currently do, which influenced how players chose their rooms. It will probably take a long while for the repercussions of this change to even out, causing H to have a slightly higher market price than the other minerals (partly due to the fact that acids seems to be used more often than bases). Regardless of the current state of the market, it is worthwhile to check the market prices when considering which minerals to try to cover with your room choices.
Reshuffle your rooms
When you first started picking which rooms to claim, you probably decided based on how many sources were available in each room and surrounding rooms. This is still important, but as you'll find out, mineral choice is just as important. You might also wish to have a better access to SK rooms. You may see a preferable settlement pattern in your area of control. Don't be afraid to unclaim controllers as necessary in order to achieve that pattern.
It might break your heart to unclaim an RCL8 controller, but don't let that stop you! A room that isn't ideally placed will just be a burden as time goes on.
Of course, shuffle rooms only as your energy income will support it. It is possible to support multiple growing rooms from just a few fully-mined SK rooms. If you see that you have a way to go before your next GCL increase and you only have one room that is pre-RCL8, that is the perfect time to do a reshuffle. The silver lining is that you'll have an increased-cap for getting those precious controller upgrade points. This is a great way to speed things along if balanced correctly.
Optimize your terminal-network
The next big logistics challenge will be optimizing your terminal network. You've probably already started sending energy to growing rooms and minerals to make compounds. Of course, all these transfers come at a cost. The good news is that you can reduce these transfer costs significantly by following a few rules:
- Prioritize transfers to closer rooms - Let's say you have two sources of H. Each source should be the primary supplier for the rooms that are closest.
- Reduce the number transfers needed - To make a single compound of XGH2O, you'll need 8 raw minerals which will be used for 6 intermediate compounds. The more reactions you can do in a single room, the fewer transfers you can get away with.
- Don't send energy for power processing - If you are processing power, it is much better to send the power to a room with surplus energy than energy to a room with surplus power.
Trading with other players
A great way to fill in the gaps of your mineral network is trade with other players. Almost certainly there is someone out there with something you need that also needs something you have. Prior to the release of the built-in trading market, we did this on the #trading channel in the screeps slack network. Check back after we've all had some time to get familiar with this new feature, as I'm sure it will play a central-role in player trading.
Post-market-release tips
The Market api has definitely changed the landscape of player trading in screeps. You can easily unload and buy your minerals dynamically. Most aspects of the market follow what you'd expect from any supply/demand market. There are a couple points worth mentioning:
- When to deal and when to createOrder - Simply put, using Game.market.createOrder costs credits, using Game.market.deal costs energy. Use this information according to your needs. For example, buying energy using deal for rooms greater than a certain distance will end up costing more in energy than you will receive from the deal. On the other end of the spectrum, if you are buying some high-end boosts that cost a significant amount of credits per unit, use deal. The energy transfer costs are bound to better than the credit cost of creating the order.
- Sell it if you got it - Even players using a 10cpu account or those without very many rooms can use the market to support a well-balanced mineral operation. Once you have enough of a certain mineral type, sell all the excess and using those credits to buy any minerals you are lacking. If you have a growing empire, consider using those credits to buy energy.
- #trading still works - If you are bottlenecked by a specific mineral and need some short-term progress, chances are you are still going to find a trading partner in #trading.
Defending your rooms
Within a novice area, well-supplied towers are usually more than enough to keep your rooms safe. The possibility of boosted invaders will change that. Towers will continue to be important, but more important will be an active creep defense.
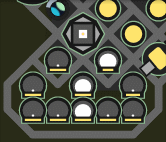
It is possible for a single boosted healer-creep to outheal all six towers. A well-boosted dismantler can remove 6m hitpoints (or more) from your walls over 1000 ticks. You'll need to find an additional source of damage to protect your walls. Ramparts are widely used for this purpose.
The above room shows one way to structure your walls so that there is a rampart within range of every possible attack position. Dealing with a creep attacking on top of one of those ramparts as well as the tower damage will take a very creative attacker.
Another aspect of walls worth thinking about are layers. For a wall that is 2+ layers thick, the number of walls needed to remove to accommodate more than one attacker increases in a favorable way for the defender for each additional layer of wall. For example, in order to attack the 2nd layer of a wall with more than one attacker, you must remove a position in the first layer for each attacker. The downside to multiple wall layers is they make a great nuking target. Two layers seems to be a nicely balanced compromise.
Finally, ramparts aren't just for your defensive perimeter; they can be constructed under your other structures. The benefits of doing this are three-fold:
- Store structures fortified with a rampart can only be accessed by the owner of the rampart (assuming the rampart has not been set to public).
- Structures behind your perimeter but within ranged attack distance from the exterior can be protected. This can allow you to safely place towers closer to your walls and maximize their damage output, for example.
- If a rampart has enough hit points to survive a nuke, the structure it is protecting won't be damaged or destroyed. Since nuke landing points are marked, and they take a very long time to land, it is possible to react to a launch by building and fortifying ramparts under your high-value structures in the blast range.